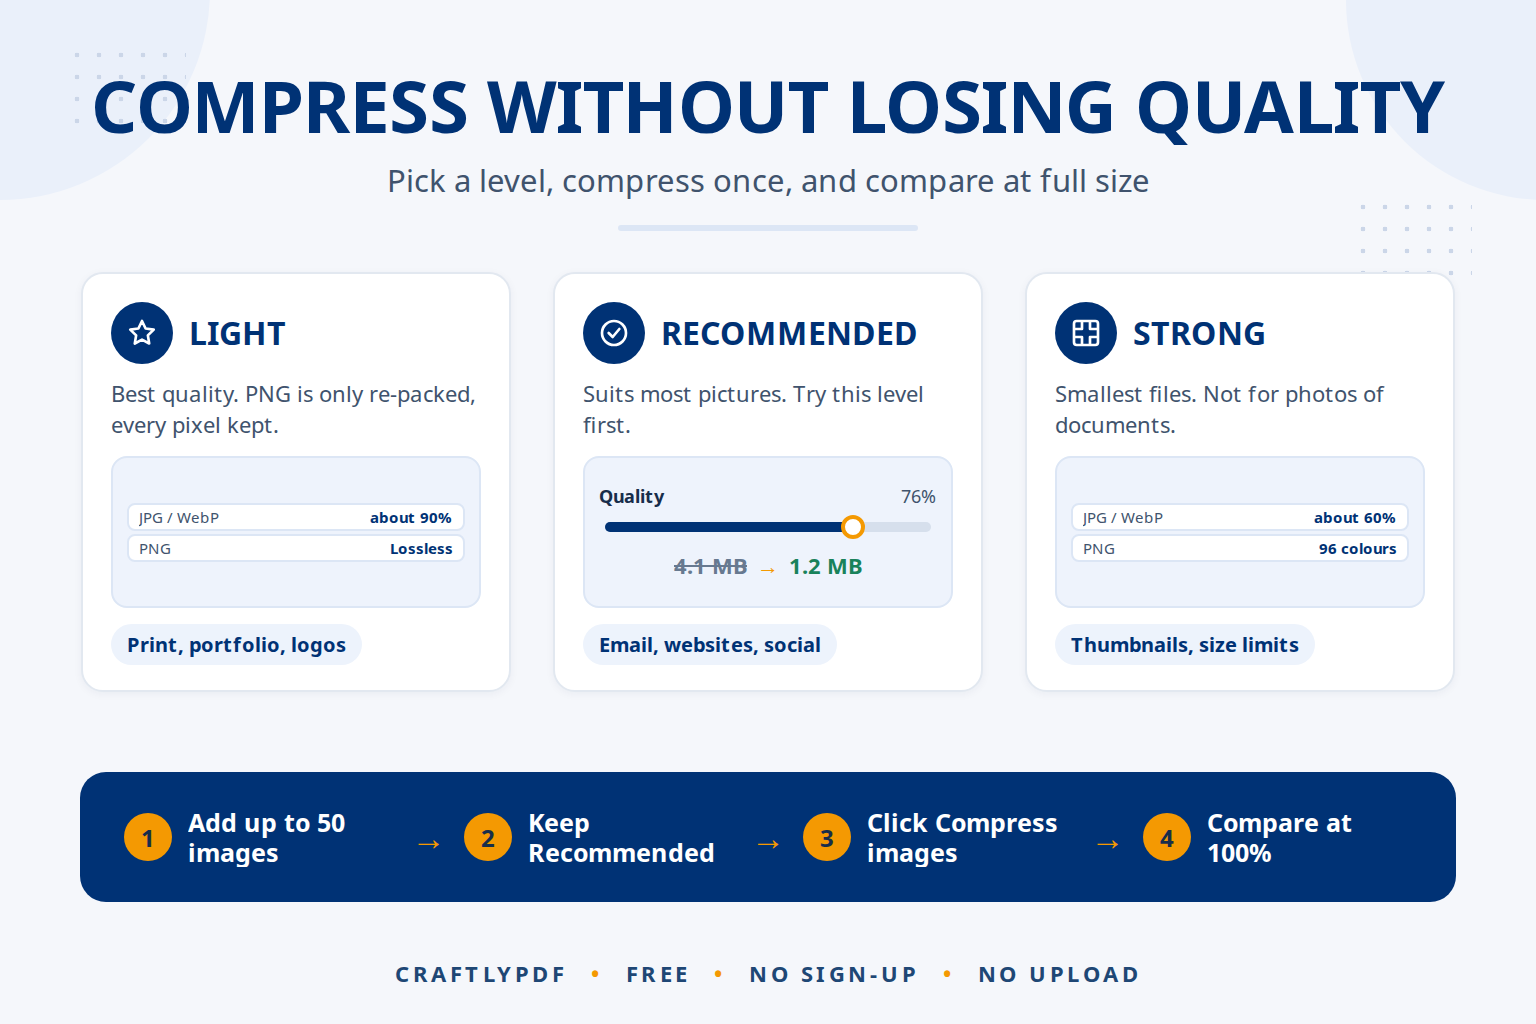
To compress an image without losing quality you can see, remove only the detail your eyes don’t notice: save JPG and WebP photos at a moderate quality, reduce the colours of PNG files, and don’t keep more pixels than you need. Start from the original picture, compress it once, and compare the result at full size before you replace anything.
This guide explains what “without losing quality” really means for each format, which compression level to pick, and the habits that keep photos sharp while files get much smaller.
Compress your images now: free, no sign-up, and your pictures stay on your device.
Lossy vs lossless: what “without losing quality” means
There are two ways to make an image file smaller. Lossless compression packs the same pixels more tightly, so the picture is identical to the original. Lossy compression throws away fine detail that people rarely notice, such as tiny colour differences in a blue sky, and gets much smaller files in return.
| Format | How it is made smaller | Truly lossless option? | Best for |
|---|---|---|---|
| JPG (JPEG) | Lossy: lower quality setting | No, every save loses a little | Photos |
| PNG | Lossless re-packing, or fewer colours | Yes, re-packing keeps every pixel | Screenshots, logos, graphics with transparency |
| WebP | Lossy or lossless | Yes, but lossy is what saves the most | Websites: photos and graphics |
So for photos, the real goal is no visible quality loss. A well compressed JPG looks the same as the original on screen and in normal prints, even though some data is gone.
How to compress an image (step by step)
- Open Compress image and choose your pictures. You can add up to 50 JPG, PNG or WebP files at once, up to 50 MB each.
- Under Compression, leave Recommended selected. It suits most pictures.
- Under Save as, keep Same format as the original unless you want to convert (more on that below).
- Tick Also shrink very large photos only if the picture is for a screen, not for printing. It limits the longest side to 2,560 pixels.
- Click Compress images. The list shows each picture’s size before and after, for example
4.1 MB → 1.2 MB (71% smaller). - Download one picture, or all of them together as a ZIP. Files are named like
beach (compressed).jpg, and your originals are not changed.
Which compression level should you choose?
| Level | JPG / WebP | PNG | Use it for |
|---|---|---|---|
| Light (best quality) | Quality about 90% | Every colour kept, file re-packed (lossless) | Photos for print, portfolio work, logos with soft edges |
| Recommended | Quality about 75 to 78% | Up to 256 colours | Email, websites, social media, most everyday pictures |
| Strong (smallest files) | Quality about 60% | Up to 96 colours | Thumbnails, previews, forms with strict size limits |
If you are not sure, try Recommended first. Open the result next to the original at 100% zoom. If you can’t tell them apart, you are done. If you see blotches, try Light. PNG files work differently: why PNGs get so big and how to shrink them explains colour reduction.
7 habits that keep images sharp
- Start from the original. A photo sent through a messaging app has usually been compressed already. Compressing it again adds damage on top of damage.
- Compress once, at the end. Each time a JPG is edited and saved, it loses a little more. Crop and edit first, then compress the final version.
- Fix the pixel size before the quality. A 4000 × 3000 phone photo shown 1200 pixels wide on a web page carries about eleven times more pixels than needed. Shrinking it saves far more than lowering the quality. For web pages, see the right image sizes for a website.
- Match the format to the picture. Photos belong in JPG or WebP. Screenshots, charts and logos stay sharper as PNG. Google’s WebP documentation reports lossy WebP files 25 to 34% smaller than comparable JPGs. See JPG vs PNG vs WebP for a full comparison.
- Check the tricky areas. Compression shows first in smooth skies, skin, and around text. Zoom in there before you decide.
- Go easy on photos of documents. Receipts and forms need readable small print. Use Light or Recommended, not Strong.
- Keep your originals. Store the full-size version somewhere safe and share the compressed copy.
How much smaller will your image get?
It depends on how the picture was saved in the first place. Photos straight from a phone or camera are usually saved at a very high quality, so they often shrink a lot. Pictures downloaded from websites or social apps were usually compressed already, so they may barely change.
The tool never hands you a bigger file by accident: if a picture can’t be made smaller in the same format, the original is kept and the list says already optimised, kept as it was. To go further, tick the shrink option or try WebP.
Compressing AI images and photos for AI tools
AI image generators such as ChatGPT, Gemini and Midjourney often deliver large PNG files. They look great, but a few of them can make a web page slow. Before you post an AI image, run it through Compress image with Save as: WebP for a website, or JPG if the place you upload to doesn’t accept WebP. Keep the original PNG in case you want to edit it later.
It also works the other way. When you upload photos to an AI assistant such as ChatGPT, Claude, Gemini or Copilot, smaller files upload faster on a slow connection. For photos of documents, use Light or Recommended so the AI can still read the small print, and always check the AI’s answer against the original.
Before uploading personal pictures to any AI service, check its privacy settings. Compressed copies made here also leave out the hidden camera and location details that phones save in photos.
Common problems
The compressed file is bigger than the original
This only happens when you change the format, and the list says larger, because of the format change. For example, a simple PNG screenshot can be smaller than the same picture as a JPG. Choose Same format as the original instead.
I see blocky patches or fuzzy edges around text
The compression was too strong for that picture. Use Light, and keep screenshots and graphics with text as PNG.
The picture barely got smaller
It was already well compressed. Tick Also shrink very large photos, choose Strong, or save as WebP.
“Not a JPG, PNG or WebP picture”
GIF, SVG and HEIC files are not supported yet. On iPhone, choosing photos from your library in Safari usually turns them into JPG for you. On a computer, open the picture in your photo app and export it as JPG first.
Frequently asked questions
Can you compress an image without losing any quality?
Yes, with lossless compression: the Light level re-packs PNG files without changing a single pixel. JPG photos always lose a little data when saved again, but at a sensible quality the difference is not visible.
What is the best format for small files with good quality?
WebP usually gives the smallest files for both photos and graphics. Use JPG where WebP isn’t accepted, and PNG for screenshots and logos that must stay crisp.
Does compressing an image reduce its resolution?
No. The width and height in pixels stay the same unless you tick the option to shrink very large photos. The only exception is a picture over 16 megapixels, which is reduced so every device can handle it, and the list then shows the new size.
Is it safe to compress images online?
With ToolsCampus, the pictures are compressed by your own browser and never uploaded. With other sites, check whether your files are sent to a server and how long they are kept.
Want to put your photos into a document afterwards? JPG to PDF turns them into one PDF (see putting several pictures into one PDF), and smaller photos make a smaller PDF that is easier to email (see PDF too big to email).
Compress your images now. Pick a level, click once, and see exactly how much you saved.